
Quick Guide
This procedure is a simplified procedure for Office File Creator. For detailed procedures, please refer to Instruction manual.
1. Install
From the Install page, go to the AppExchange page and click "Get It Now". Proceed through the screens in order, and when the installation screen appears, select "Install for Admins Only" and click "Install". After the installation is complete, log in to the Salesforce organization in which you installed the app.

From the OFC_License tab of the Office File Creator application, you can check OFC Editions (Free/Standard/Pro) and License Information (Status, Expiration Date) for the paid versions.
Instruction manual
2. Grant Permissions
Grant permissions to each profile. *This procedure is for Office File Creator Ver. 2. If you are using Ver. 1, refer to Grant Permissions (Office File Creator Ver. 1).
- Admin user is the user who manages the OFC_Template record and template files, logs, and is the contract administrator.
- General User is the user who outputs files.
Permissions for Office File Creator Ver. 2
|
Settings |
Name |
Admin User |
General User |
|
Custom App Settings |
- |
・Office File Creator ・Office File Creator Classic |
- |
|
Custom Tab Settings |
OFC_Templates |
Default On |
Tab Hidden |
|
OFC_Child Object Options |
Default On |
Tab Hidden |
|
|
OFC_Logs |
Default On |
Tab Hidden |
|
|
OFC_License |
Default On |
Tab Hidden |
|
|
Custom Object Permissions |
OFC_Template |
Read/Create/Edit/Delete |
Read |
|
OFC_Child Object Option |
Read/Create/Edit/Delete |
Read |
|
|
OFC_Log |
Read |
- |
|
|
Field-Level Security |
OFC_Template |
Read/Edit Access to all fields. |
- |
|
OFC_Child Object Option |
Read/Edit Access to all fields. |
- |
|
|
OFC_Log |
Read Access to all fields. |
- |
|
|
Apex Class |
- |
Grant access to Apex classes with the names beginning with "ofc2.". |
|
|
Visualforce Page |
- |
Grant access to Visualforce Pages with the names beginning with "ofc2.". |
|
Instruction manual
3. Create Template File
Create a template file for the form source.
Common
Template file format
- Create a template file in the same file format as the output file format, either Excel (.xlsx, .xlsm), Word (.docx, .docm), or PowerPoint (.pptx, .pptm). For PDF output, create a Word (.docx) format.
- Not all layouts and output patterns are supported. Complex layouts are not supported.
- Template file size should be within 1 to 2 MB as a guideline. Even within 1 to 2 MB, if the file contains a large amount of text or images, the file will fail to output.
- Not all features of Office files are available. Some features will be ignored.
- Template files should be created in the Microsoft Office desktop version. Template files created by the online version or other applications are not supported.
Merge Field
- Enter the merge fields with the format {!Object Name.Field Name} in the template file. The format of the merge field is the same as the Salesforce classic email template.
- The fields of the master object and related child objects can be used as the merge fields.
- Formulas cannot be used such as {!If(xxxxx)} for the merge field.
Example of merge fields
Standard field of standard object: {!Opportunity.Name}
Custom field of custom object: {!Bill__c.IssueDate__c}
Child Object
- For the merge fields of the child object, set {!Child Relationship Name.Field Name} format in the template file. If the reference field is a custom field, append "__r" at the end of the child relationship name
e.g., The reference field is a standard field: {!OpportunityLineItems.Product2}
e.g., The reference field is a custom field: {!OpportunityCases__r.CaseNumber} - For the merge fields of the child object, enter only one line. The number of lines is output according to the number of child records.
- To output sequential numbers of child records, enter {!number()}. Sequential numbers starting from 1 are output.
*How to check the child relationship name
- Go to the Object Manager and check the list of fields of the corresponding child object.
- Click on the field name of the master object's reference fields in the child object's field list.
- The content displayed in the child relationship name in the field's setting information is the child relationship name. At this time, if the parent object's reference field is a custom field, the child relationship name will be the one with "__r" appended to the end of the displayed child relationship name. For package objects, prefix with namespace prefix + "__".
Sample
Master Object
{!Opportunity.Name} *Standard object.Standard field
{!Bill__c.IssueDate__c} *Custom object.Custom field
Child Object
{!OpportunityLineItems.Name} *Parent's reference field is a standard field.Standard field
{!BillDetails__r.IssueDate__c} *Parent's reference field is a custom field.Custom field
Sample Template

Instruction manual
4. Create Template Record
Create Template Record
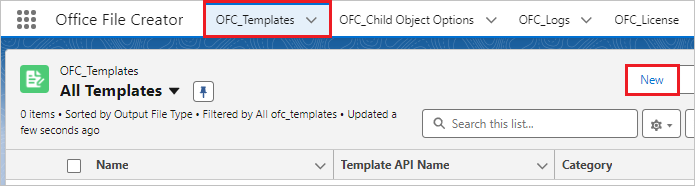
Select "Office File Creator" from the application launcher, and from the OFC_Template tab, click the "New" button in the list view.
Enter each field and click Save.
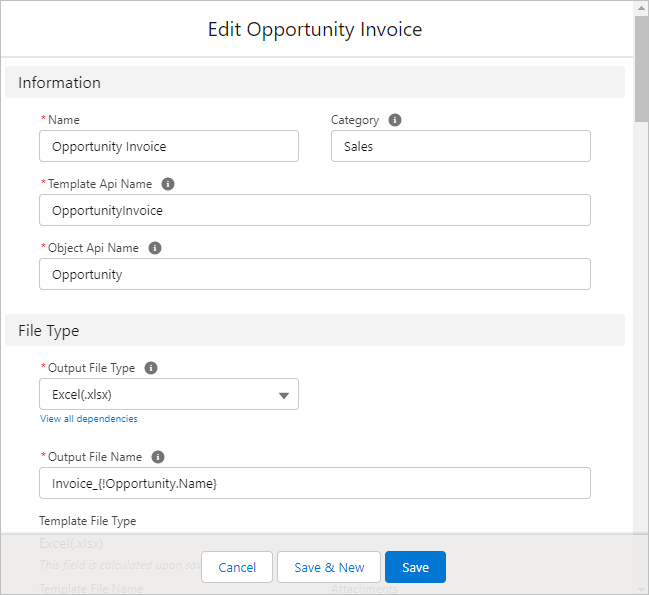
Fields (only required fields)
| Field name | Contents |
| Name | Enter the template name. |
| Template Api Name | Template Api Name can only contain alphanumeric characters and underscores, must begin with a letter. e.g. Opportunity_Quote_Excel |
| Object Api Name | Enter the master object name used for the merge field in the template file. e.g. Opportunity |
| Output File Type | Select the file type to output files. |
| Output File Name | Enter the output file name. The master object fields can be used as the merge fields. e.g. Quote_{!Opportunity.Name} |
Upload Template File
Upload the template file from the Upload Template File component on the OFC_Template record page.
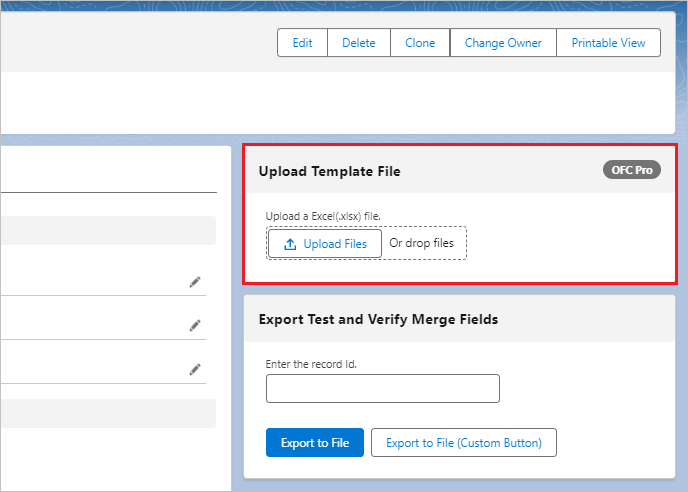
Export Test and Verify Merge Fields
Enter the record Id, such as Opportunity record, in the text box on the Export Test and Verify Merge Fields component, and click Export to File.

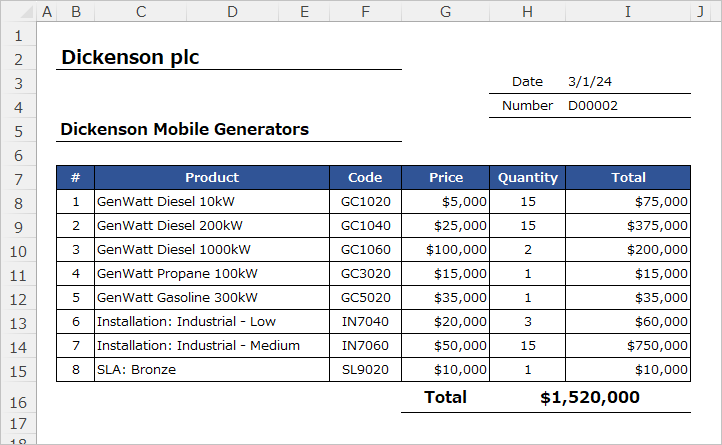
Open the output file and check that the contents of the file are correct, such as whether the values of the merge fields have been output correctly and whether the layout is correct.
Instruction manual
5. Create Custom Button
Create custom buttons to output files on the record detail page.
*If you want to output and save a file from the button of Lightning Component, please refer to Create Lightning Component Button.
From the Object Manager in Settings, click on "Buttons, Links, and Actions" of the target object, then click on the "New Button or Link" button.

Enter each field and click Save.

Copy the value of the "Custom Button URL (XXX)" field in the OFC_Template record, and paste it into the URL.
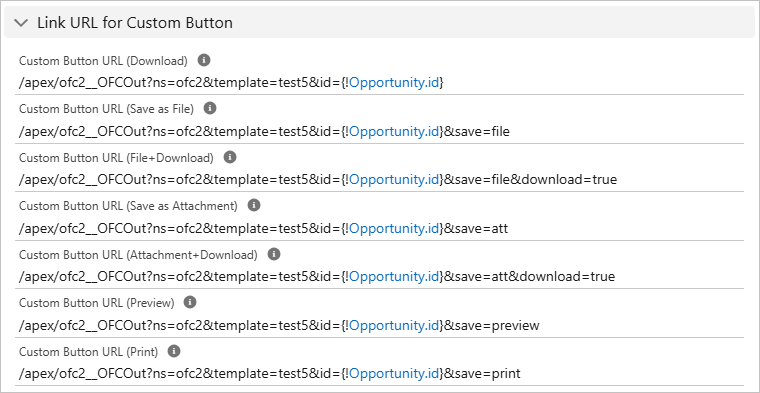
Open the page layout edit screen from "Page Layout" of the target object, and place the custom button you created by drag & drop.

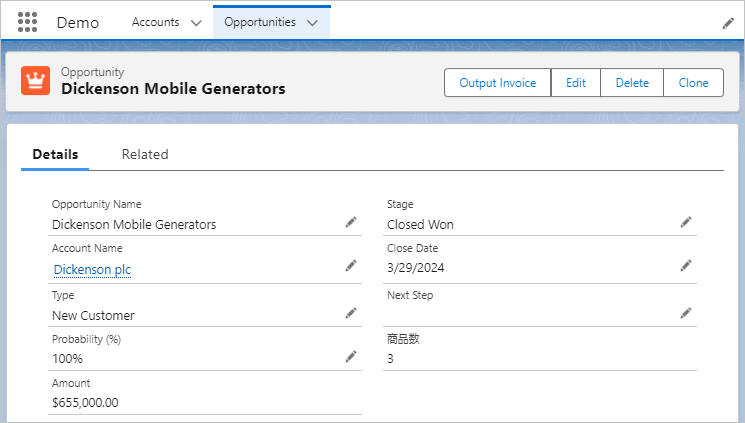
From the record detail page, click the Custom button to output (or save) the file.
Instruction manual
Create Lightning Component Button