Following the previous step of creating a template file, create a template record.
About the previous step of creating a template file, please refer to Generate an Excel file in Salesforce using Office File Creator – (1) Create a template file.
Create a template record
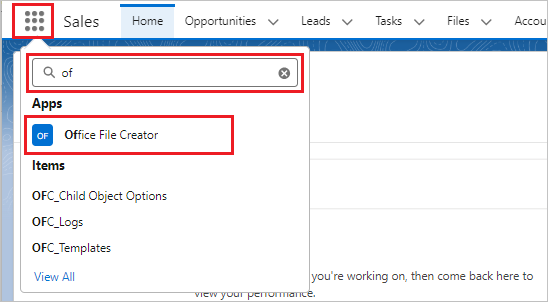
Click the icon of the App Launcher and enter "of" in the Seach apps and items box. Click "Office File Creator" in the Apps.
*For Ver. 1, select "OFC_Template".
The OFC_Template list view will be shown. Click the "New" button on the top right of the screen.
Enter values for each field.
Information Section
Name
This is the name used to manage the template record. In this example, enter "Opportunity Invoice Excel".
Category
Same as the name, this category is used to manage template records. In this example, enter "Sales Department".
Template API Name
Template API Name is used for the custom button link set up later. In this example, enter "OpportunityInvoiceExcel". Only alphanumeric characters and underscores are allowed.
Object API Name
This is the Object API name of the primary object of the record to be output. In this example, enter "Opportunity" since the primary object is Opportunity.
File Type Section
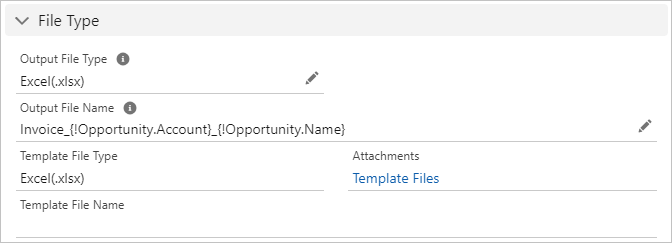
Output File Type
In this example, Excel is output, so select Excel(.xlsx).
Output File Name
In this example, the name of the output file is Invoice_Account Name_Opportunity Name. Set the merged field to the Account name and Opportunity name, and enter the "Invoice_{!Opportunity.Account}_{!Opportunity.Name}".
This is the end of the required fields. The sections below are optional and should be filled in only if there is something you wish to set.
Reference Field Section
The reference field is displayed as a Name field in the record detail page or list view, but when it is output by Dataloader, the Id is output. For example, when the Account Field, a reference field for Opportunity, is output by Dataloader, the Account Id is output. Same as Dataloader, Office File Creator also outputs Id for reference fields.
If you want Office File Creator to output a name field instead of the Id, check the "Output Name Not Id For Reference Filed" checkbox. If you want to output Id as it is, check it off. The default is checked.
Save as File Section
Office File Creator can output files in three patterns: "Output to File", "Save as File" and "Save as Attachment" to a record. When "Save as File", set the "File Access to Linked Record".
- If you select "Viewer," users with record access rights will have viewer access rights to files attached to the record.
- If you select "Set by Record", users with record access rights will have edit access rights to the files attached to the record.
For example, if you save a file to a record using Office File Creator from the record detail page of Opportunity and do not allow anyone other than the user who saved the file to edit it, set "Viewer".
If you want to allow others to save or delete a version of the file, select "Set by Record". The default value is "Viewer".
Memo Section
The Memo is for managing template records. Enter any notes, such as a history of changes to the template file.
Create Child Object Option Records
Create a Child Object Option record if you want to output by the child object's criteria or sorting. The merge fields of the child object will be output without creating child object option records. In this case, we will create the child object option record to specify the output conditions and sorting. *Child object = Related object.
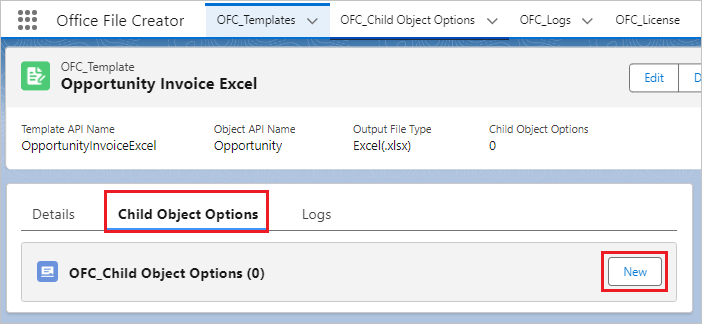
Click the "Child Object Options" tab on the OFC_Template record screen and click the "New" button in the OFC_Child Object Options related list.
Information Section
Name
Enter the child object name "Products".
Child Relationship Name
Enter "OpportunityLineItems" for the child relationship name of the Product.
Field Criteria Section
A checkbox field with a custom field name "Cancel" and API name IsCancel__c is created in Opportunity. If Cancel is True, it is not output.
FilterCriteria Field API Name
Enter "IsCancel__c".
FilterCriteria Operator
Select "=" as the operator.
FilterCriteria Value
Enter "False".
Sort Order Section
Set the sorting. In this case, the order is ascending by Product Code and descending by Quantity.
First, set ascending order by Product Code for the first sorting field.
SortField1 API Name
Enter "ProductCode".
SortField1 Order
Select the "Ascending (NULLS LAST) ", where "(NULLS FIRST) " is first if blank and "(NULLS LAST)" is last.
Second, set the descending order by Quantity for the second sorting field.
SortField2 API Name
Enter "Quantity".
SortField2 Order
Select the "Descending (NULLS LAST) ".
Memo
There is no upper limit to the number of child objects set in a template file, but the maximum number of child object records is 30 per OFC_Template record.
Upload the template file
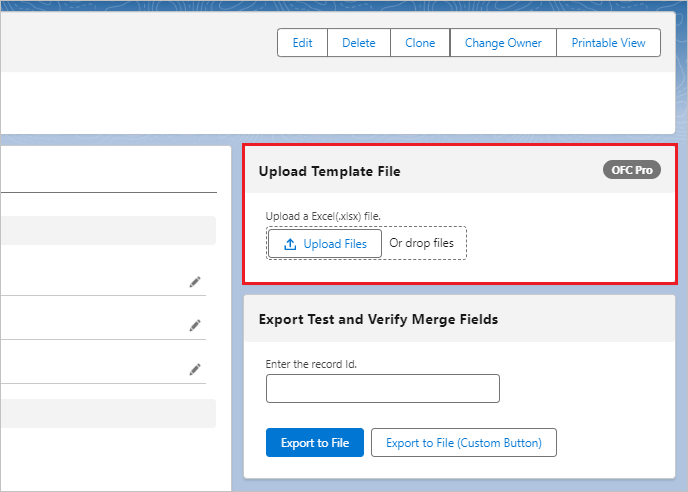
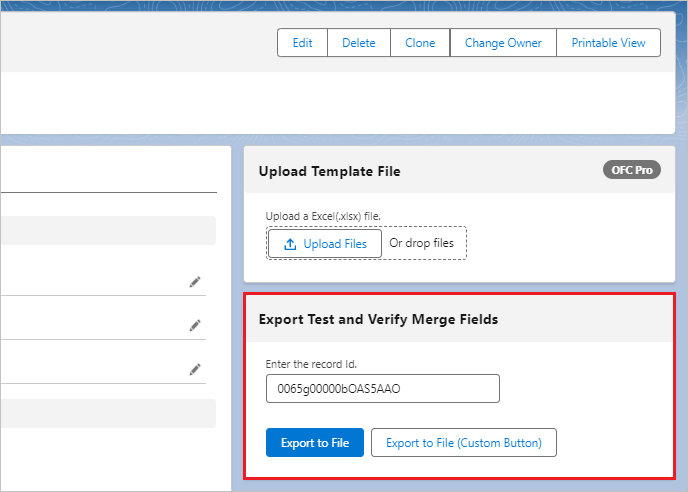
Upload the created template file by dragging and dropping it into "Upload Template File" on the template record details page.
Export Test and Verify Merge Fields
Test the template file by outputting the file to check if the merge fields and template records in the template file are set correctly. Enter the record Id of the primary object in the "Export Test and Verify Merge Fields" text box. In this example, the record Id of Opportunity is set.
To check the Id, open the record detail page of the object, and the record Id is what is displayed next to the object name in the URL.
For example, if the URL of the record detail page of Opportunity is as follows, the record Id is "0069D00000PbGbAQAV".
https://yourdomain.lightning.force.com/lightning/r/Opportunity/0069D00000PbGbAQAV/view
After entering the record Id, click the "Export to File" button.
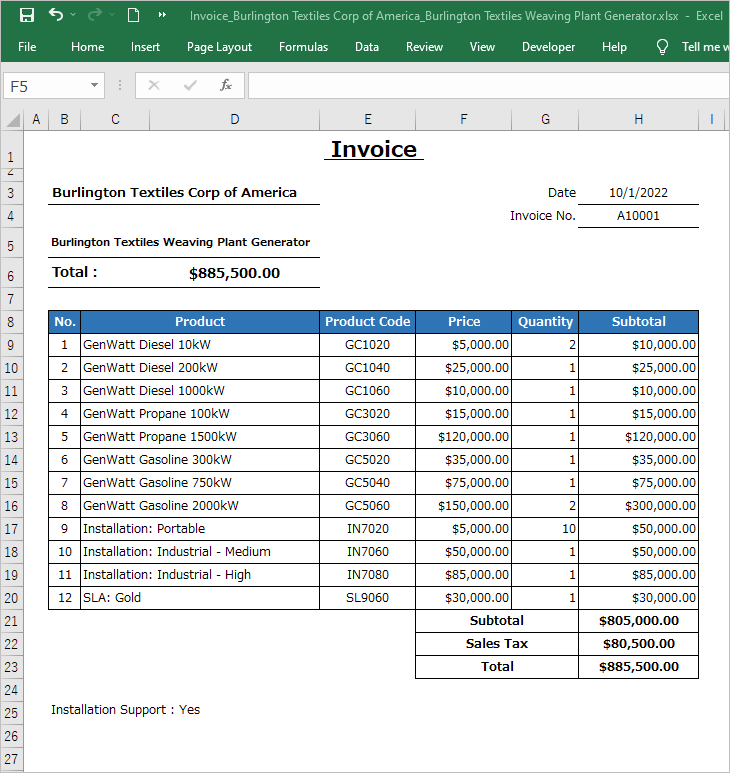
Open the output file and check its contents.
- Are all the merge fields output correctly?
- Is the file name correct?
- Is the layout correct?
- Are the filter criteria and sorting of child objects correct?
etc.
The next step is to create the custom buttons.
Please refer to Generate an Excel file in Salesforce using Office File Creator – (3) Create custom buttons.

